Image Reslicing
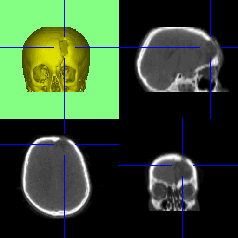 This mode provides orthogonal image reformatting at an arbitrary orientation.
The 3D image is displayed, as a guide to orientation, together with three
orthogonal slices. The positions of the slices are shown by the blue lines.
The left mouse button can be used to drag the cross hairs in any of the
displayed quadrants by clicking and dragging in the chosen quadrant. The
images in two other quadrants will be updated as the cross hairs move.The
cursor keys allow fine control as described in Interaction.
This mode provides orthogonal image reformatting at an arbitrary orientation.
The 3D image is displayed, as a guide to orientation, together with three
orthogonal slices. The positions of the slices are shown by the blue lines.
The left mouse button can be used to drag the cross hairs in any of the
displayed quadrants by clicking and dragging in the chosen quadrant. The
images in two other quadrants will be updated as the cross hairs move.The
cursor keys allow fine control as described in Interaction.
Scans are frequently slightly misaligned with respect to the patient,
making it difficult to properly compare left and right sides. This option
allows the slices to be displayed symmetrically by straightening the 3D
image before entering this reslice mode.
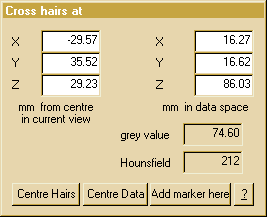 A separate
popup window displays the positions of the cross hairs both in image space
(The centre of image is at 0,0,0 and x,y,z axes are aligned with the current
view) and in the original data space( The 0,0,0 reference is at the top
front left of the data with the x axis across the slice, y axis down the
slice and z axis through the slices). These values are updated when the
cross hairs are moved and can be explicitly set by typing in the edit box
(press return to set new value). The data space values match those printed
in the measurement window
when placing markers. If the put
to centre option is selected on a marker, this point in the data will
be at the centre of the field of view in the 3D reslice images. The grey
value and Hounsfield boxes display the value of the data at
the position of the crosshairs. The grey value shows the interpolated
value of the 8 bit grey scale (0-255) and, if there is a Hounsfield mapping
table in the data header file, the Hounsfield box shows the equivalent
Hounsfield number.
A separate
popup window displays the positions of the cross hairs both in image space
(The centre of image is at 0,0,0 and x,y,z axes are aligned with the current
view) and in the original data space( The 0,0,0 reference is at the top
front left of the data with the x axis across the slice, y axis down the
slice and z axis through the slices). These values are updated when the
cross hairs are moved and can be explicitly set by typing in the edit box
(press return to set new value). The data space values match those printed
in the measurement window
when placing markers. If the put
to centre option is selected on a marker, this point in the data will
be at the centre of the field of view in the 3D reslice images. The grey
value and Hounsfield boxes display the value of the data at
the position of the crosshairs. The grey value shows the interpolated
value of the 8 bit grey scale (0-255) and, if there is a Hounsfield mapping
table in the data header file, the Hounsfield box shows the equivalent
Hounsfield number.
 |
This button restores the cross hairs to the centre of the current field
of view without moving the 3D image. This is useful if the position of
the slices has become confusing. |
 |
This button moves the 3D field of view so that the current position
of the cross hairs is moved to the centre of all four images. This option
allows a region of interest to be centred in the view prior to resizing
it for a detailed examination. |
 |
This button places a marker at the current position of the cross hairs.
This marker can only be seen and measured in the measurement
mode. |
 |
Clicking on this displays this help file. |
Back to index
©2005-2007 Robin Richards. All
rights reserved.