3D Editing
 This mode
is used for segmenting the data set into a number of components which can
then be moved independently within the view control
menu to allow surgical simulation. It displays an edit control window
and selects a brush for painting on the image. The last two brushes sweep
across the full extent of the window. The size of the spot brush is adjustable.
By default, the entire image is marked in the current object colour so
that the upper selection button will keep everything in the viewing window.
Press the right mouse button in the main window and drag to unpaint a region
of the image (leaving it marked in the aux colour) (this colour can be
modified in the colour selection menu). Click
and drag with the left mouse button to re-paint a region in the main colour.
Once the regions are painted satisfactorily, the two selection buttons
in the edit menu allow the choice of keeping either coloured region. The
Undo Last Edit button reverses the effect of the last Keep This
Region click. A 2D slice editing mode is
also available for fine detail adjustment of edit state at the voxel level.
3D editing mode is not available when the Radiographic
rendering mode is selected.
The painting tools are also used for defining a surface region when measuring
its surface area using painted area in the Options
menu.The area to be measured should be marked in the aux colour.
Dual Object Principle:
A total of eight objects (numbered 0 to 7) may be cut from the original
data set. Multiple copies of the same part or overlapping copies are possible.
At any one time, two of these objects may be tagged as having special status
(Current & Aux.).The Current obj. is the one, from the available set
of objects, which is being examined or operated upon. When editing an object,
the discarded fragments can be put into the aux. object. This mode is selected
by checking the Discards to Aux. obj box. By swapping the current
and aux. objects, it is possible to move pieces back and forth between
objects until a satisfactory edit is achieved. This is useful for example
if it is necessary to isolate a complex shape such as a mandible from the
skull. Note that editing is view dependent and that setting a different
imaging threshold may show components that have not been edited as expected.
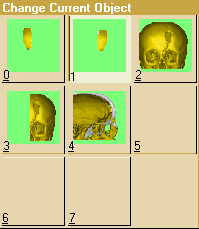
The buttons Current obj. and Aux. obj. display a list
of objects to allow reselection.  The
highlighted image indicates the existing state of the system. Clicking
on any image exits the list, selecting the chosen object. If an object
selected to be the new "current obj" is already in the "Aux
obj" state, the current and aux tags are automatically swapped.
The current object can, at any time, be emptied or restored to the full
data set by clicking on the Empty Current Object or Restore Current
Object buttons.
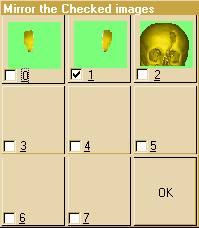
Each object can be mirror imaged about the vertical midline of the current
view at any time. Clicking on the Mirrored Object List button displays
a list of all objects with the mirrored ones tagged. Any of the tags can be flipped and the new state is implemented when the
ok button is selected.When the mirrored state of an object is changed the
object is left-right reflected through a vertical plane in the current
view. This option allows the reconstruction of missing parts of anatomy
by duplication and mirroring of existing contra-lateral parts.
The menu also contains a selection of different brush styles for painting
regions. The first five brushes are the same size and shape as the white
part of the cursor, the last two paint a stripe the full height or the
full width of the screen respectively. If a region is outlined with a brush,
the patch in the middle can be painted in by clicking on the flood fill
button and then clicking, with either the left or right button as appropriate,
inside the region to be filled. Only a region with a closed boundary will
be filled. Clicking outside the main window aborts the flood fill mode.
Normally this mode only displays the current object being worked on.The
show composite button causes an image of all the objects included
in the composite set to be drawn. When HiRes
is selected, images of the current and other objects are mixed together
by dithering to produce a translucent effect. When HiRes
is not selected, the images are depth sorted with the nearer surfaces obscuring
more distant surfaces. The control menu changes to show its altered function.
The composite list button allows the user to change which objects
are included in this set.
Duplicate Current Object causes a copy of the current object
to be created in the next available object. The number chosen is reported
by the system. Creating a duplicate is often useful when mirror imaging
a contralateral part of the data to simulate the reconstruction of a missing
part of the anatomy.
Complement of Current Object causes a copy of what is NOT in
the current object to be created in the next available object. The number
chosen is reported by the system. This is often useful if you have forgotten
to check the Discards to Aux. obj box.
Complement of All Objects causes a copy of what is NOT in any
of the objects to be created in the next available object. This allows
"lost" bits to be recovered..
Having edited a data set, the "save edit" option in
the file menu allows the information
to be saved to a disc file for later retrieval.
Back to index
©2005-2007 Robin Richards. All
rights reserved.
 This mode
is used for segmenting the data set into a number of components which can
then be moved independently within the view control
menu to allow surgical simulation. It displays an edit control window
and selects a brush for painting on the image. The last two brushes sweep
across the full extent of the window. The size of the spot brush is adjustable.
By default, the entire image is marked in the current object colour so
that the upper selection button will keep everything in the viewing window.
Press the right mouse button in the main window and drag to unpaint a region
of the image (leaving it marked in the aux colour) (this colour can be
modified in the colour selection menu). Click
and drag with the left mouse button to re-paint a region in the main colour.
Once the regions are painted satisfactorily, the two selection buttons
in the edit menu allow the choice of keeping either coloured region. The
Undo Last Edit button reverses the effect of the last Keep This
Region click. A 2D slice editing mode is
also available for fine detail adjustment of edit state at the voxel level.
3D editing mode is not available when the Radiographic
rendering mode is selected.
 The
highlighted image indicates the existing state of the system. Clicking
on any image exits the list, selecting the chosen object. If an object
selected to be the new "current obj" is already in the "Aux
obj" state, the current and aux tags are automatically swapped.
 Any of the tags can be flipped and the new state is implemented when the
ok button is selected.When the mirrored state of an object is changed the
object is left-right reflected through a vertical plane in the current
view. This option allows the reconstruction of missing parts of anatomy
by duplication and mirroring of existing contra-lateral parts.