| Movie Control |
Displays the movie control window |
| Slice Movie Control |
Displays the movie control for the threshold window |
| Volume of object |
Calculates the volume of the currently displayed object. Tissue below
the selected threshold is not included in the volume. The accuracy of this
measurement depends upon the selection of an appropriate threshold value. |
| Surface area of object |
Calculates the surface area of the currently displayed object. The
area of a hollow object includes both the inner and outer surfaces. The
accuracy of this measurement depends upon the selection of an appropriate
threshold value. The calculation separately displays areas for the rendered
surfaces and the cut sections. Incorrect results may occur if the crop
controls have been used to edit the object instead of the proper edit
facilities,. |
| Painted area |
Calculates the area of a region marked on the visible surface. The
edit mode can be used to mark a region (without
actually editing the data). This can only measure a continuous visible
surface and will report errors if it detects a step edge in the surface
being measured. This measurement relies upon the screen image and will
be more accurate if the feature being measured covers a large fraction
of the window and is rendered in HiRes mode. |
| Difference of surfaces |
Calculates the shortest distance of each point on one object surface
from a second object surface. The two objects must have been created by
editing. |
| ZDifference of surfaces |
Calculates the distance between surfaces perpendicular to the plane
of the screen. This is quicker than the above option but, for surfaces
at an angle to the plane of the screen, it can give misleading results. |
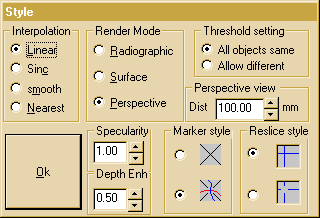
| Style |
Select interpolation mode, surface/perspective/radiographic , perspective
viewing distance, Marker style, cross hair style & threshold style.
NOTE: sinc & smooth interpolation modes are ~50x slower than linear!
|
| Timing |
if tagged, shows rendering time |
| HiRes |
if tagged, render at 512*512 resolution, otherwise 256*256. Composite
View is affected by the HiRes mode. A depth sorted effect is produced
when Hires is not tagged and a translucent effect is produced when HiRes
is tagged. |
| Negate data while loading |
if tagged, the data will be loaded as a negative with dark parts of
the slices bright and the bright parts dark. This allows the thresholding
to operate in reverse for imaging the darker parts of the original data. |
| Normal + negated data load |
if tagged, the slices will be loaded twice (this doubles the number
of slices). The first set will be as normal, the second will be negative
(as in the above option). An edit state is automatically set up, which
separates the two sets into different objects (0 & 1) and aligns these
for mixed imaging. It also sets the threshold style to allow separate thresholding
of the two objects. |
 This
popup allows control of some of the program style options.
The choice of interpolation mode affects image quality, the precision
of marker placement and the smoothness of saved depth maps. Linear should
be adequate for most practical purposes. Sinc and smooth interpolations
are MUCH slower but may give better quality reslicing
images depending upon the properties of the loaded data.The smooth
option IS appropriate for saving depth maps (Zbuffers) for C.N.C milling
control and especially for the creation of stereolithography data for rapid
prototyping.
Surface imaging is the default render mode on start up. The threshold
window is used to remove all tissue below the selected threshold, allowing
viewing of denser tissues. The radiographic mode simulates the generation
of a radiograph through the data from the chosen direction. The threshold
window is used to remove all tissue above the selected threshold, allowing
good renderering of soft tissue detail in CT by removing the dense bone
signal. Setting a high threshold still allows rendering of hard tissues.
In radiographic mode it is not possible to place
markers, back cull, perform 3D
editing , compare depth maps or save depth maps.
Perspective
Rendering defaults to a parallel projection mode (viewpoint at infinity).
A perspective view of the surface rendering can be selected. The viewpoint
distance edit window will be enabled when perspective is selected, allowing
the user to define a viewing distance from the centre of rotation of the
viewing window. In perspective mode it is not possible to place
markers, back cull, perform 3D
editing , ortho reslice , compare depth
maps or save depth maps.
Specularity and Depth Enhance allow adjustment of the
surface rendering. An increased specularity (default value = 1.0) makes
the rendered surface look more metallic. An increased depth enhancement
(default value = 0.5) accentuates the sense of depth in the image by darkening
the parts of the object further from the viewer.
The threshold setting mode is only significant when the 3d
editing option has been used to create multiple objects. These objects
are either forced to be rendered at the same threshold
or allowed to be set to different thresholds.
Two styles of marker are available when placing
landmarks. One is a simple cross, the other provides surface contours
which can assist in accurate placement of markers on curved surfaces.
Two styles of cross hair are available when reslicing.
One is a set of solid lines, the other provides a small gap at the centre
in case the lines obscure the object at the centre of interest.
Back to index
 This
popup allows control of some of the program style options.